Babies have a way of taking over your life – and it’s no different when it comes to your hobbies! It didn’t take long after having a baby to have Pinterest dangle all kinds of fun DIY projects for kids in front of my nose. I quickly pinned a number of DIY kid’s playhouse makeovers, waiting for the day when I could find a good one on Facebook Marketplace to do over. So, when a friend of ours asked if I was interested in their kid’s playhouse I was instantly excited and had visions of all kinds of things I could do. It was in great shape, but there were still so many ways I wanted to customize the house.

I didn’t plan on writing this up for the blog since I haven’t done a post in years, but I learned a lot from this Step 2 playhouse makeover and feel there are lessons that are worth sharing. This is a very detailed post. If you’re interested in getting straight into the makeover itself, skip down to the section “Spray Painting: Prep.”
This post contains affiliate links, which means that if you click/make a purchase through some of these links, I will make a small commission. For more information please see my Privacy Policy, and thank you!
Not Every DIY Playhouse Makeover is the Same
The first lesson learned was that most kid’s playhouse DIYs I found online were not like mine. Many bought kid’s playhouses brand new and then painted them before they had been used and put together. Many others had wooden playhouses (that also were brand new) that they DIY’d. This made their process very different from mine.
I started with a used and already assembled plastic Step 2 Neat and Tidy Pink Cottage Playhouse. This impacted the paint I could choose and the accessories I could easily add, very different from a brand new plastic playhouse or a wooden one. In the end, I agree that buying a new playhouse would make spray painting much easier. The pieces would already be apart to make spray painting things like the faucet easier. Having a wooden playhouse would make customizing and painting a different story. There are easier and cheaper options for wood paint, and it’s much easier to cut and screw into wooden playhouses to accessorize. That being said, I feel like the beauty of a DIY is taking something old and making it new. That’s what I did here!
And, since this process WAS different, I’d like to thank the various DIY trailblazers who forged the way for me and tried things out on already well-loved kids playhouses. I’ve read so many posts that I can’t credit them all, but this post, in particular, was very helpful. The process I now explain is largely based on that tutorial.
My Step 2 Playhouse Makeover
Powerwash & Clean
Materials used: Drill (to remove all the screws quickly) | Powerwasher | Scrub brush from Dollar Tree! | Bucket of Dish-soapy water
The very first thing I did, like many others, was to take the house apart and powerwash it. I wish I had a “before” picture, but since I didn’t know I was going to post about it, I didn’t bother taking one. A number of people who were working from used playhouses mentioned the importance of getting the playhouse clean. I actually purchased this powerwasher on sale with that in mind (don’t worry…I’ve wanted one for other reasons too and am really glad I got this one). It made cleaning the pieces quick and actually quite fun!
First, I sprayed the piece on both sides. Then, I used my $1 scrub brush to do a once-over with some soapy water, focusing on areas that seemed particularly discolored. Finally, I went over it one more time with the powerwasher. I’m not sure if the soap was needed, but since I didn’t plan to use primer I didn’t want to risk it.
Tip: Power wash on a clean blacktop or large, clean tarp – at first, my plastic tarps were too small and all I ended up doing was splashing dirt up onto my clean pieces.
Spray Painting: Prep
Materials used:
- canvas drop cloth
- plastic grocery bags (for covering)
- blue painter’s tape or masking tape
- various props for standing up pieces to paint
On to the playhouse makeover itself. The spray painting steps are the most important to get right – there are so many aspects that go into the right conditions.
First, pick a day with the right temperature and little wind! Too hot or too cold and the paint won’t cure properly. Too windy and you’ll end up having to use more coats and the ones you do get won’t be even.
Then, take EVERYTHING apart. Look up the manual for your house online if you need to to learn how to take it ALL apart (I’m talking windows and doors especially). I couldn’t figure out how to get the shutters out of the window or the faucet off the sink so I just taped them up. I thought I did it in a smart way but every single option had its issues. (see below)
If you can’t take everything apart, then tape it up strategically. As I go into later, I spray painted one side at a time and one color of paint at a time. I taped off the main part of the house while I spray painted the shutters pink. That meant I had to get tape under where the shutter swung back and forth and rubbed against the window.


I tried pulling a grocery bag under that opening and I tried putting tape under that opening. In the end I think the tape worked best, though the bag was easier to work with and pull through. However, in both cases, the spray paint from the shutter stuck to whatever was under it. To paint the other side of the shutters I had to “open” them. When I did, it rubbed against the house below and chipped paint off. This led to more recoats to deal with spots that chipped off and a longer drying time. I had to go through that whole opening and closing and taping and retaping AGAIN when I painted the main color of the house.

After taping, set everything up to spray paint on a canvas drop cloth rather than a plastic one (here is the one I used). The paint won’t stick to canvas like it will to plastic. If you can’t fit everything, it’s ok to spread it across multiple days so you have enough space. I did that because I wanted to make sure accent colors on the shutters were truly dry before touching and taping to them while painting the main house color. Do yourself a favor and make sure you stake it down with heavy items on the corners!
Lean your pieces up on a raised item – I used some empty plant containers and an old kitty litter box! lol! The kitty litter box worked surprisingly well for the larger items. I fit them right over the box on the windows. I recommend doing this because I found it easier to get even coats when I could hold the can of spray paint more upright. Being off the ground also made it easier to get the edges/ends.

Spray Painting the Pieces
Materials used:
- Rustoleum 2X UltraCover Paint + Primer in whatever colors you’re going for. I used:
- Gloss Candy Pink for the doors and shutters (I actually would not recommend)
- Satin Canyon Black for the roof
- Matte Clear for the topcoat
- Satin Blossom White for almost everything else.
- Spray Paint Comfort Grip – totally worth it when you’re spray painting so many items. Also easier to maneuver the can.
- For the gold accents I used Rustoleum Universal Metallic All Surface Paint + Primer in Pure Gold.

Now that you’re ready to actually paint, be careful. Use a number of light, even coats, close together. The wind can affect this, so wait until a breeze dies down before spraying. Otherwise, if you spray too much at once, it can start to drip.
If the spray paint does drip, you can touch it really quickly to rub away the drip and then recoat lightly. I found that I got the best coat when I worked on one or two pieces at a time, all the way through a side. When I have spray painted other plastics in the past, the paint has bubbled when I went to add a second coat. That didn’t happen this time and I think it’s because I followed the directions on the can more carefully. I used light coats, and added any extra coats within the same hour as the original coats or after 24 hours. This included the clear topcoat.
I laid all my pieces out on the canvas and worked on one side of a few pieces at a time. Example: added a white coat to the front side of 3 pieces, came back and added the second coat of white to the same front side of the 3 pieces, and possibly a 3rd coat. Then, I added two clear topcoats to all three, and let those three pieces dry for an hour (used timers on my phone to be accurate). While the first sides of those 3 pieces were drying, I moved on to the next 3 pieces, using the same process and setting a new timer for the second set of pieces. When the timers went off, I went back to my original 3 pieces and flipped them over to coat the other side.

Before adding a second color to some of the pieces, I let them dry 24 hours. As mentioned above, this got pretty tricky with some items. For the shutters, the best option for me was to cover the already-painted pink shutters with a plastic grocery bag. I made sure that the pink shutter paint had 24 hours to dry before I did the next step. I recommend figuring out how to remove them. If you can’t, you can do like I did and wrap a plastic bag around each of the shutters. Tape the plastic bag to itself, not the paint (see image above). When I taped directly on the pink paint, it peeled off, even using blue painter’s tape. That could partly be because the pink paint was a gloss paint and it seemed to peel off easier than the satin paints.

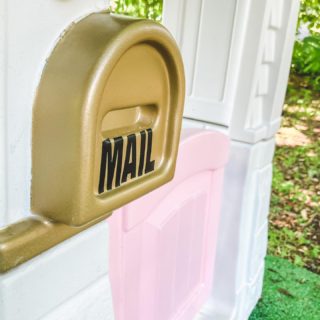
I wanted the mail box to be gold, but it was one solid piece with the white column. So, I used a brown paper bag and made a cut-out of the area that I wanted to protect and used it like a stencil, taping up the rest of the exposed column. I also taped up the faucet since I couldn’t figure out how to get it off without breaking it.

These pieces were spray painted gold with a clear topcoat. Be careful! I ended up having to go back and touch up some of my white column (so annoying…) because I didn’t pay attention to or be proactive about my overspray. I also sprayed the grille, doorbell, faucet, and the house numbers and door handle I purchased gold.

Note in the picture below that I taped up the floor of the house before spray painting it white. The grey color seemed appropriate for the floor and I felt like it would wear better than spray painting it white. I’m glad I did because already I have had to powerwash the floor a few times to get dirt out (my daughter thinks dirt is bugs 🙄).
Let everything dry the appropriate amount of time and then reassemble the pieces! As you can see, my little “helper” was very interested in this part.

😂 I recommend trying to do this without a toddler present!

Wrapping Up the Playhouse Makeover
Since this post has already been so long, I will hold off on the accessories for another post. HOWEVER, I will say that if you intend to add a knob to your door – do that before you put the door back on!
My door handle came with screws that went in from the back into the handle itself. Since the door was so thick, I knew it would be very hard to do this and get the bolt and the handle lined up properly. I also worried that, with the bolt sticking out the other side, it would catch her little clothes and skin. So, the only option I had was to glue it. This was nearly impossible to do once it was upright. So, glue it with E6000 while it is laying flat, so it doesn’t move while drying. I don’t know if it will last, but that’s what I would try if I were to do it again.
Here is where we are approximately ending for this post, but don’t be fooled! There is more to come in this Step 2 playhouse makeover!

I ended up using a little over 7 cans of white spray paint, two cans of the clear topcoat, one can of black paint, one can of pink glossy paint and one can of gold.
This is not where it ends though! Oh no! The accessories are what brings it to life! Here’s a sneak peak!

It’s going to be great! If you found this post helpful, please pin it to your DIY Pinterest board. And check back in a few weeks for the final reveal, accessories and all!


 Loading...